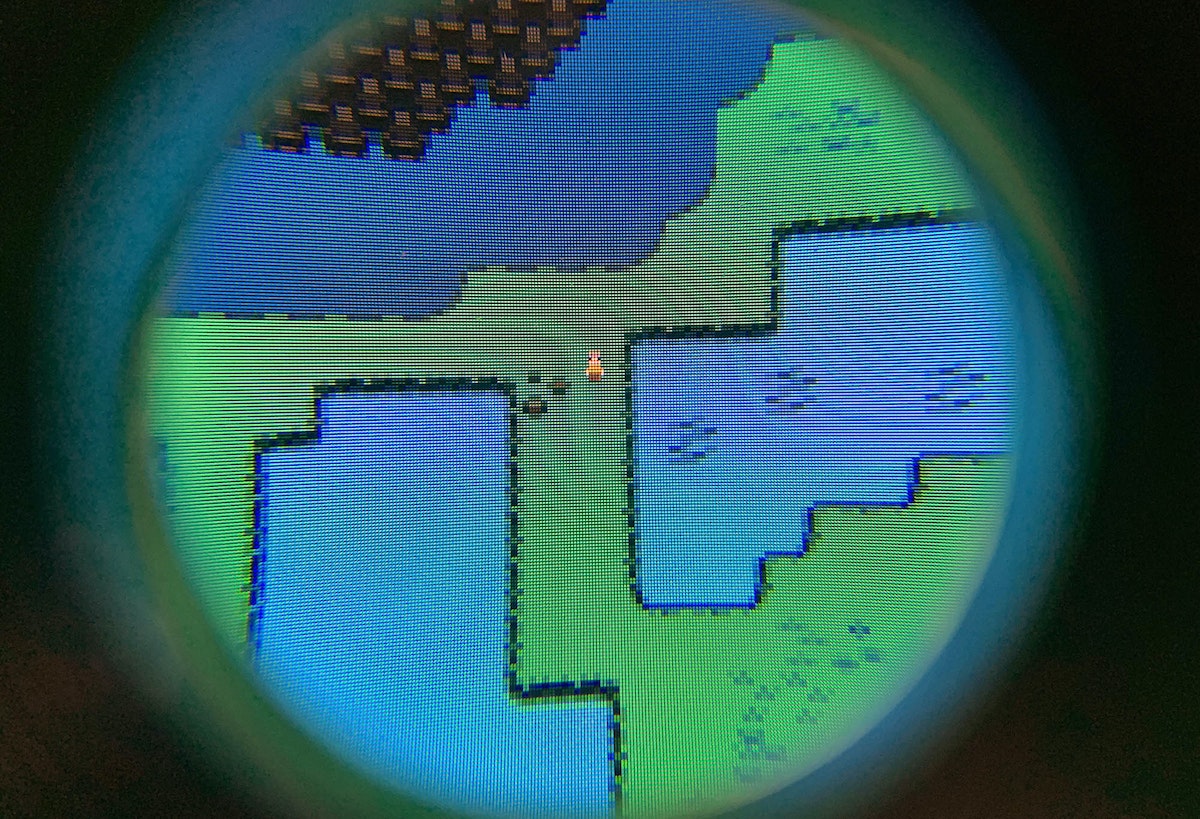
As pixels become a hidden quality, what would it be like to expose and celebrate this tiny landscape? Maybe it’s some sort of nostalgia for the pixel, but I thought it would be fun to prototype a game where part of the gameplay is uncovering this “hidden world” of pixels inside these new displays—and so the world’s smallest pixel art game was born.
Looking through the loupe
To start the project, I needed to see these tiny pixels up close. I bought a cheap jeweler’s loupe—basically a magnifying glass—and pressed it up against an iPad. Things looked promising with a 10x loupe. The level of magnification allows you to see the individual pixels, but still see a decent amount of the play area around the character. However, if your eye is pressed against the eyepiece of the loupe, it would make touch controls a challenge because you can’t see anything but the small area in the magnifying glass. To work with this constraint, I wondered if I could make the loupe itself the controller for the game.
The way iPads and most tablets sense touch is using a “capacitive touchscreen.” This type of display creates a grid of areas that hold electrical charge. When a fingertip touches the screen, the charge at and around the point of contact decreases, communicating where the finger is to the tablet. Electrically conductive gloves and styluses are able to work on these screens because they allow the properties of your finger to extend through the conductive material. So using the same idea as a conductive stylus, I put some aluminum tape on the loupe to transmit the capacitance from your fingers to the display. This allowed a player to move the loupe around the screen, and through doing so, interact with the game.
Exploring a tiny world
Next, I needed to develop the game. I borrowed from some of the classic role-playing-game tropes from games I played as a kid, building out a landscape that included many different climates—a desert, a lake, a forest, a deep forest, an ice tundra, and more. I created a tiny character that the player guided around the landscape by moving the loupe.
The idea is that the whole game is played on a single static overworld screen that never moves—you can explore an entire tiny world without ever moving more than a few inches. There are even a couple of fun ways the character interacts with the environment. For example, the player can force the character to fall into the lake, where he splashes around and quickly jumps out. I also created a hidden cave that shows how a game might work with inside and outside spaces that can be explored.
Overall, I’m pretty satisfied with the way the experiment turned out. There’s something about looking through the magnifying glass and into this new world that brings back some of the awe and wonder that came with exploring new worlds on my Nintendo when I was growing up—it just goes to show that screen technology doesn’t need to be pixel -perfect to transport us.
Chart your own pixel territory
Want to try it for yourself? Here’s how to get your own version of this experiment up and running:
1. Build the loupe controller
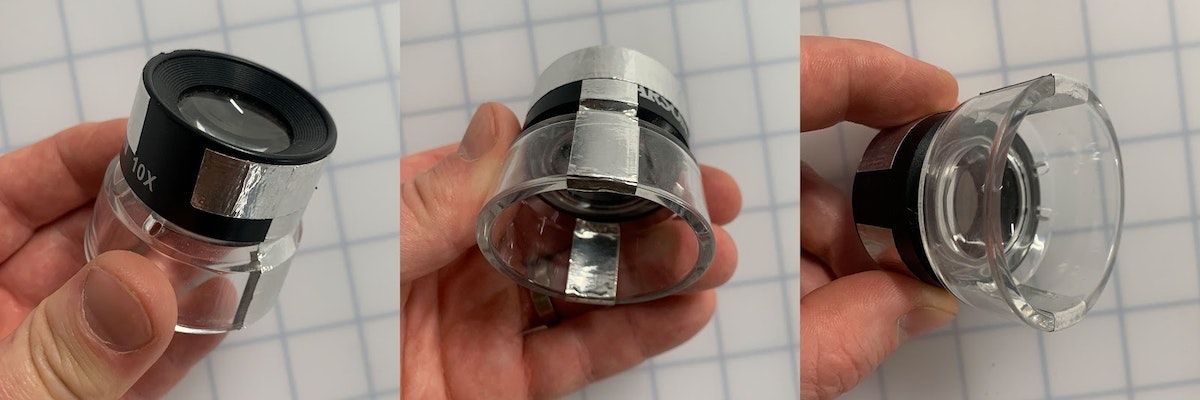
Get a loupe, and some aluminum tape. I made two separate “T” shaped pieces of tape, and wrapped them around the edge of the bottom of the loupe. This metal transmits the capacitance of your body down to the edges of the loupe, simulating two-finger touch.
2. Load the game
There are two ways to do this. First, make sure you have Unity, then download the project from Github. You’ll also want to install the Unity Remote app on your tablet.
To quickly test the project, you can plug the tablet into a USB port on your computer and open the Unity Remote app on the tablet. In Unity on the computer go to Edit > Project Settings > Editor and select the tablet. Then press the play button at the top of the main Unity window and the game will appear on your device. This will let you try things out but it will be very slow to react and move the character because it’s running on the computer and sending each screen as an image over the USB connection. More detailed instructions can be found on the Github project page.
Alternatively, if you want to run the application natively on a device at a reasonable speed, you will need to follow the directions on building for mobile to set up your device with Unity.
Either way, once you’ve gotten the game up and running, you’ll have a good sense of the game mechanics and can go into the project to edit it to create your own tiny world—changing things like the landscape and character actions, creating new characters and interactive objects, and even extending it into an actual game. Happy exploring!
A quick shoutout to some of the great resources I used to create this demo:
- Tiled: A fantastic tool for creating tiled backgrounds for 2D games. This was extremely helpful for putting together the overworld.
- Tiled2Unity: This tool helps bring the tiled data into Unity seamlessly.
- opengameart.org: A great repository for free to use game art assets. My main tiles were modified from surt’s Blowhard Chronicles.
- rm2kdev’s 2D Unity RPG Development series: A super helpful video series on developing 2D games in Unity.
Heading 1
Heading 2
Heading 3
Heading 4
Heading 5
Heading 6
Lorem ipsum dolor sit amet, consectetur adipiscing elit, sed do eiusmod tempor incididunt ut labore et dolore magna aliqua. Ut enim ad minim veniam, quis nostrud exercitation ullamco laboris nisi ut aliquip ex ea commodo consequat. Duis aute irure dolor in reprehenderit in voluptate velit esse cillum dolore eu fugiat nulla pariatur.
Block quote
Ordered list
- Item 1
- Item 2
- Item 3
Unordered list
- Item A
- Item B
- Item C
Bold text
Emphasis
Superscript
Subscript















.png)

